Pages

▼
Showing posts with label frame redo. Show all posts

June 22, 2012

20 Minute Gorgeous Cut-out Frame!

Happy Friday ya'll!!!

It's always nice to know the weekend is ahead- I'm just excited for some much needed time with my overworked hubby :) 

Did you guys get to see all the amazing stuff I scored at Michaels yesterday??
I shared my pic on Facebook yesterday because I happened to hit Michaels right after their delivery truck has been there and they had restocked their dollar bins! 
So much fun stuff to get me in trouble :)

Everything that came home with me was from their dollar bins...
except for one little thing. 
I picked up this way awesome 8x10 cutout wooden frame piece for 3 bucks!!
It's totally swoon-worthy. 

I was immediately inspired to turn it into something bright & cheery!!


Here's what I grabbed: 
*a small piece of MDF I had lying around
*The Cutout Frame
*Hot Glue Gun
*Spraypaint (white & yellow)
*Mini clip

Look how much that cut-out frame instantly dressed up a simple design: 


I'm so in love with how pretty & quick this turned out!!

Here are the super quick basic steps: 

1. Spraypaint your MDF the color of your choice (I used yellow)
2. Spraypaint your cutout frame (I used gloss white) 
3. Spraypaint your clip if desired
4. Glue the frame & clip to the MDF after it all has dried. 
5. Add a fun print or picture!!


I stuck my grey & aqua Bushel and a Peck print into the clip because it's one of my favorite songs to sing to little man. 

I love that I can change the print out for family pictures or holiday prints too :) 


The 8x10 cutout frame I purchased is perfect for displaying 4x6 pics in the middle but I'm thinking there are all kinds of fun possibilities for these guys. 
How about a cute chalkboard or string some cute letters from them? 
I'm thinking I need to run back and get a few more :) 


What do you think? 
Are you in love with the simple cutout as much as I am? 

If you are...
you  might want to be hanging around next week for a fun giveaway :) 
You just might be seeing this again!

What color combo would you like it in most?? 


Pin It

Like me on Facebook. Follow me on Pinterest. Subscribe to my feed. 
post signature

Linking to:


June 18, 2012

Scrabble-Inspired Baby Gift

I totally have a thing for using old games in baby gifts.   

Remember when I used jenga blocks in my last baby gift? 
I think they're SO fun and add a little quirky touch that's perfect in celebrating a new little person!!
This time I used another fun game and absolutely LOVED the result. 

Check out how old games can become seriously cute: 


Are you thinking of all the old scrabble games you've seen at garage sales & Goodwill? 
Next time pick one up and store it away- they're perfect for a little extra fun in a project!!

This gift was so easy to put together & I love that it's simple but meaningful :)
This gift was for my husband's cousin, who we didn't know all that well.
So I had no idea what colors the nursery were in or anything.
I decided to go for subtle and easy to fit in with any color scheme. 

Supplies: 
*Old frame (Mine was a deeper frame than most)
*Spraypaint
*Scrabble pieces- letters for name & one letter holder
*Wooden Initial 
*Hot Glue Gun

I found this horrifyingly neon yellow frame buried in my stash in the garage: 


It got a nice coat of gloss white and was looking so much better. 
I let it dry overnight. 


I cut a piece of blue-ish grey scrapbook paper to fit in the frame & mounted it in. 


This was the fun part :)
I love seeing the whole thing come together!

I sprayed both the wooden initial and the scrabble letter holder in the same gloss white.
Then I distressed the letter holder for a little more charm. 

I spelled out 'william' in the scrabble letters & adhered them to the letter holder with hot glue. 
Super easy & worked perfectly!


I secured the wooden initial with hot glue directly onto the glass. 
The same went for the back of the letter holder. 


And now you have a way cute & whimsical way to display baby's little name!!


But you can't stop with just a cute gift right?
It's all in the packaging!!

I found a cute blue bin in the dollar spot at Target and snatched it up.
I added a wooden 'w' that was already white to the front. 

Super easy & cute container to give the gift in!
Not to mention it's bonus storage for the mom-to-be. 


What do you think? 
Will you be snatching up any old scrabble games you see next?? 

What I think is so fun about this gift is all the possibilities!
You could use your own last name for some fun wall art or even make one for a wedding gift. 

********************

I am SO Excited about what will be happening around here next week.

I'll be hosting my first ever Summer Blog Bash with some AMAZING fellow bloggers!

We have a lot of fun in store plus an epic giveaway that you won't want to miss!!

So make sure you're ready June 25th to party it up with us!!!


Pin It

post signature

Linking to:


May 29, 2012

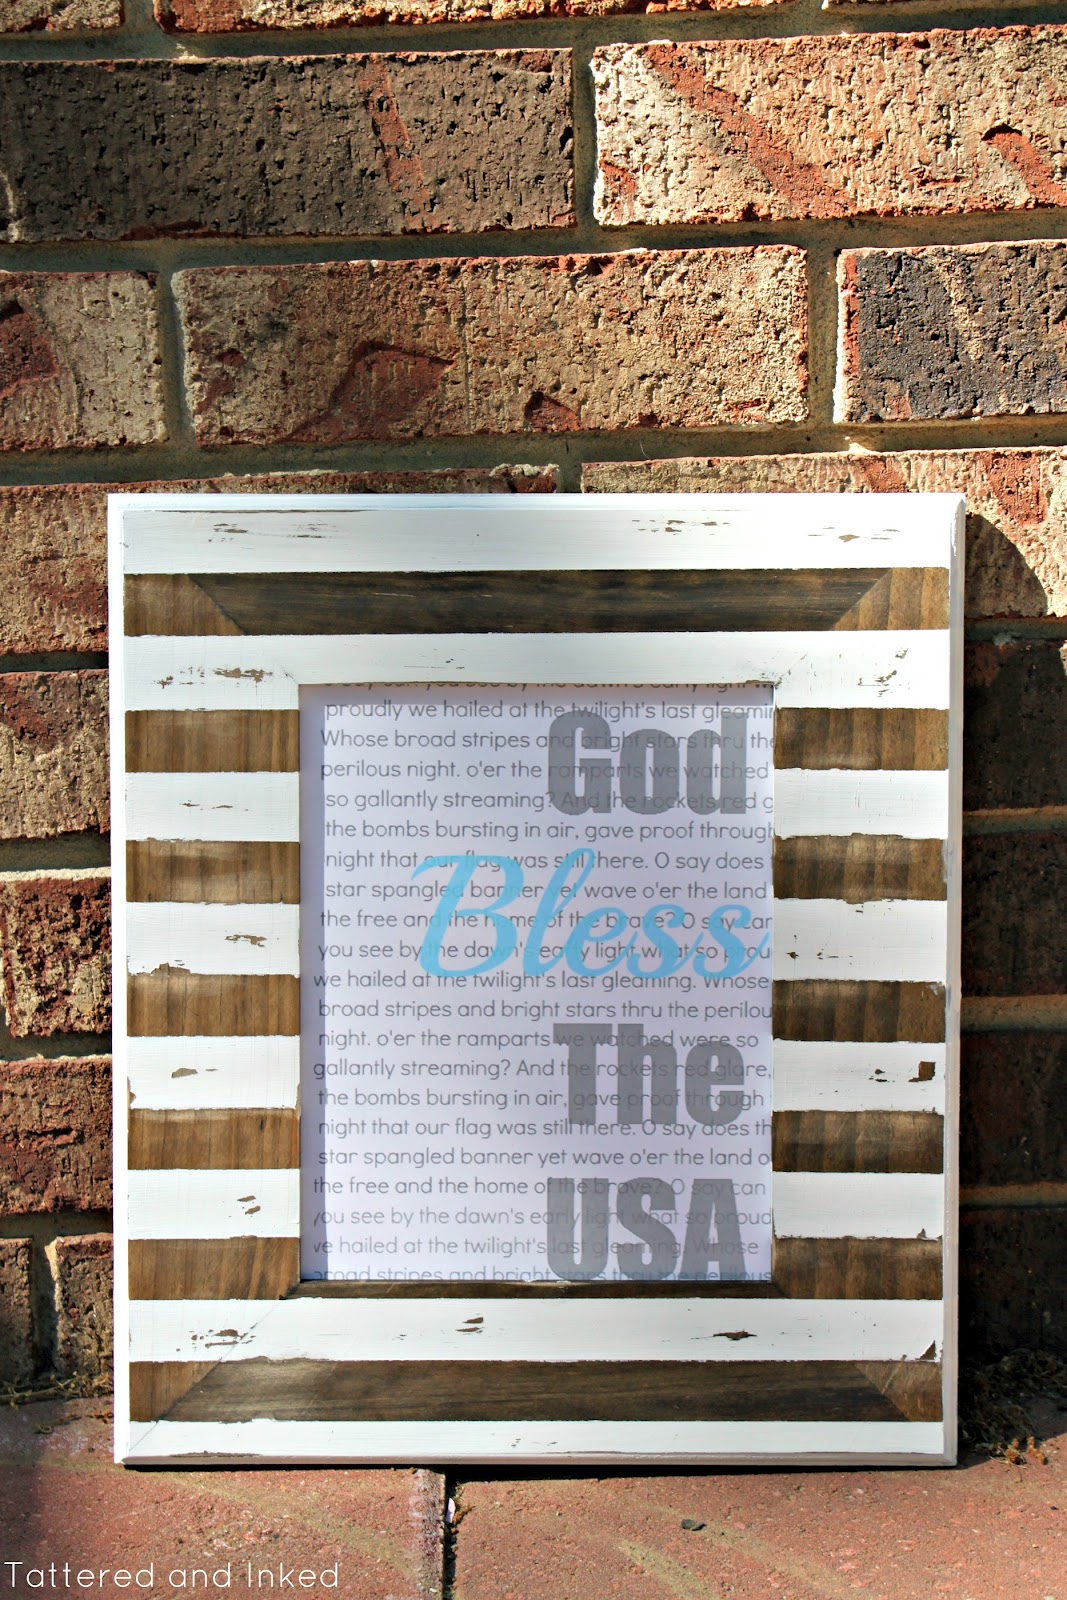
Shabby Striped Frame


Hey you guys!
Did you have a great, sun-filled Memorial Day weekend??

I sure hope it was great :) 
I was able to relax with my boys a bit which was exactly what I needed. 
It's weird having classes sporadically throughout the summer... and having 5-6 days off between each one.
Makes me feel out of sorts some.

But soaking up the sun at the lake this past weekend was amazing. 
And then we just had a lazy family day all day yesterday which is rare. 

But back to all the craziness now :)

I know I'm a tease and I shared a fun sneak peek of one of my weekend projects on my facebook page yesterday...
but that's not what I'm showing you today.
Told ya I was a tease :)
That's coming later this week...you'll just have to stick around!!

I think you'll like this quick little project just as much. 
I was in need of a space-filler when little man accidentally broke one of my doo-dads that sits on my fireplace. 
So here's what I came up with...with a little patriotic flare at the moment. 


Didn't it turn out shabby-chic gorgeous? 

I'm in love with dark wood against a creamy white.
It's just perfection...

It started as one of those plain, blank frames from Hobby Lobby...


And I used my new favorite dark walnut stain by Rust-oleum. 
I love love love how this color turned out.
I usually use Minwax but bought this on a whim and am SO glad I did. 
Beautiful dark color :) 


I stained the whole frame with the dark walnut and let it dry overnight. 

I wonder if you've ever noticed that about half my small projects occur on the floor of my living room. haha. 

My rug or coffee table always seems to be in background...
and weird little fact- I've used the same couple pieces of scrap paper to paint/stain on for...umm...forever.
And I finally had to throw them away after this project because they were practically shredding apart. 
Sniff. 


After the stain was good and dry, I used painters tape to tape off some thin stripes. 


Then I painted a creamy white with some acrylic paint I had on hand. 
It took a couple coats to get a good, even coverage. 

I made the mistake of using off-brand painters tape thought...and it bled through some.
No problem with this project because I was shabby-ing it up anyway. 
But good to know for anytime I'm wanting perfect lines. 


Then peel the paint off and you get instant gorgeous stripes!
I took a piece of sanding paper to it to shanty it up. 
I wanted it to have that scuffed look so the stain could show through some of the white stripes. 


And I was in love :)
I'm going to be using it to display different printables throughout the seasons. 
I haven't had a place to do that yet so it's nice to have a frame completely dedicated for change. haha. 


And in case you're wondering where the patriotic bling inside the frame came from, 
you'll be seeing it again soon in a free printable form :)

Cuz I  really do love you sooo much. 


I painted all the edges of the frame white just cuz.
It's one of those things that you just have to know what look you want :)
Paint until it looks right!


Are you over the whole shanty look yet? 
I'm not...but then again, I don't know if I ever will be. 
I like bits of shanty-chic here and there throughout my decor. 
Keeps everything from looking too...picture perfect. 

What do you think of my little striped frame? 
It's an easy summer project that's perfect for displaying all the fun printables out there in blogland!


If you like this project, I'd love for you to

Pin It


post signature

Linking to:


July 11, 2011

Laundry Closet Redo *Mirror to Italian Chalkboard*

July is going by wayy too fast.
I'm so not ready to begin thinking of school starting.
Going to stores stresses me out because they already have school supplies out.

Could you give it a few weeks Walmart?
Geez.
The last thing I want to think about right now is school.
*sigh*

Anywho.
I cannot wait to show you the full Laundry Closet Reveal...
but I decided to start off by showing a little project I did for it.

Since our Laundry closet is in full view once you turn down the hall to the bedrooms
(and since I ripped those awful bifolds out)
I wanted it to not just be functional, but also be nice to look out.
Which was a big job if you saw the before picture.

This was a little project I did to add some 'pretty' to it :)

I found this great mirror at Goodwill for cheap.
It's really a hard plastic material rather than wood or metal but it worked just fine.
It wasn't incredibly pretty to begin with though...


Just a bronzey-gold color that looked too old-school for  me :)
I painted it with the same color I used for part of the room (which you'll see soon!!).
It's called Krypton and I lovvvve it.
The perfect grey-blue.


After painting it, I took some glaze to it to bring out all the pretty detailing.
I also sanded it just a tad to let some of the original metal color show through.
I wanted it to have that vintage feel to it.

Then I did several coats of chalkboard paint right on top of the mirror.
Worked like a charm.


I thought forever about what to write on it...
just plain 'laundry' seemed too boring so why not take it to the next level?
Which is Italian. Duh.

I loved the Italian word for laundry...'lavanderia'.
It just rolls of the tongue...you know you want to say it :)

I added a little flourish under it for a little extra oomph.


I love all the detailing on it.
And every time I see 'lavanderia'...it makes having to do boring old American laundry seem that much more exciting :)


This was such a quick project.
Like, one afternoon type project.
The best kind :)


What do you think?
Rather do some 'lavanderia' than laundry?

Or does a snow cone sound better to you too??

Don't forget to check back in this week for the full Laundry Closet Reveal!!!
Can't wait to show you!!

signature

Linking to: