Pages

Showing posts with label DIY harry potter. Show all posts

September 25, 2021

Hogwarts Inspired Fall Entryway

 There's already so much magic in bringing out the fall decor, why not add a little more to it?? 

I posted last year about my magical tree I added to our Christmas mix and thought I'd share my new favorite fall tradition I added last year- creating a Hogwarts Inspired Entry way to usher in fall.

When my oldest son asked to redecorate his room about a year and a half ago, it meant putting away all the Harry Potter decor it had in it too. I wasn't ready to pack it up and never see it again so I decided to add it to my annual fall decor set-up. It pretty much took on a life of it's own and took over the entire foyer entryway...and I'm not mad about it at all. 

Want to see a little bit of the magic? I'll share a few DIY creations I added to the mix in case you'd like to create your own magic... and by a few, I mean nearly all of it was completely handmade. 

Let's take a peek...


I am not a huge fan of overly 'characterized' things which is really easy to fall into when recreating things from books/movies. I didn't want figurines, cartoons, etc in the set-up and instead want it to have a more authentic, real-world feel to it. Which pretty much comes down to creating a lot of things by hand. 

The authentic part of creating Hogwarts absolutely comes down to it looking worn out, old, centuries of wear/tear/magic throughout it. Which is basically my love language so we work well together :) 


I wanted a classroom/Potions set-up to take up the main area on the foyer table (you can't see it, but there's a tiny key with wings on it in the lock of the drawer- it's been there for a couple years now and is just the cutest little detail). 

I filled a handmade wooden box that Hubby made me years ago with all my potion bottles, trinkets, maps, wands, artifacts that felt magical enough and it filled up the table nicely. I used old barn wood pieces that we literally broke the ends off to give it an authentic worn out feel to create a Potions sign. Black paint and hand tracing letters onto the board worked easily enough. Don't forget to distress the heck out of your signs though. Hogwarts is old, remember? 

I ended up keeping the poufs under the table that I have there year round and draped a Hogwarts robe over one. A friend made several for us years ago. 


Throughout the Potions box, tapered gold candlesticks (a fun find a friend found for me!) are tucked in. Nothing screams magical more than flickering candelight in the evenings. 


For potion bottles, I collected various bottles and glass vases from Goodwill or discarded liquor bottles and created Potion bottles with them. 

A few I painted with white paint and then distressed and a few I left clear (the ones with fun textures/designs are great for this!) and maybe added a few things to them. For Gilly Water, I hot glued faux moss around the top and stuck in a few faux floral stems that screamed pond/swamp. You can find Potion labels all over the internet- Etsy has tons or Google free printables to get the ones you like. To age them, dye them in tea or crinkle them up before gluing to your bottles. I like to print mine on white or beige cardstock for an older look, more sturdier, look. 


I tucked feathers, faux stems, taper candles, old books and handmade wands throughout to fill the box entirely. The more 'cluttered', the better. Imagine that Potions classroom at Hogwarts and how filled with ingredients and dust it was :) 

If you have jars and containers from places like Universal Studios, this is a great to add them in without looking hokey. Honeydukes boxes, candy jars, wand boxes, chocolate frogs, etc would all be so cute tucked throughout the display. 


For the upper part of my entryway, I decked my faux mantle out with all kinds of signs and various accessories. 

This is where you would need the larger items to fill up space but still create an old, spooky castle feel. For my larger pieces, I used a piece that I created from old wood and chicken wire and then layered it was a mirror that I had acid-treated years ago for an aged look. Although not overtly Hogwarts or Harry Potter, they fit the theme well and are perfect layering pieces to bring everything together! 


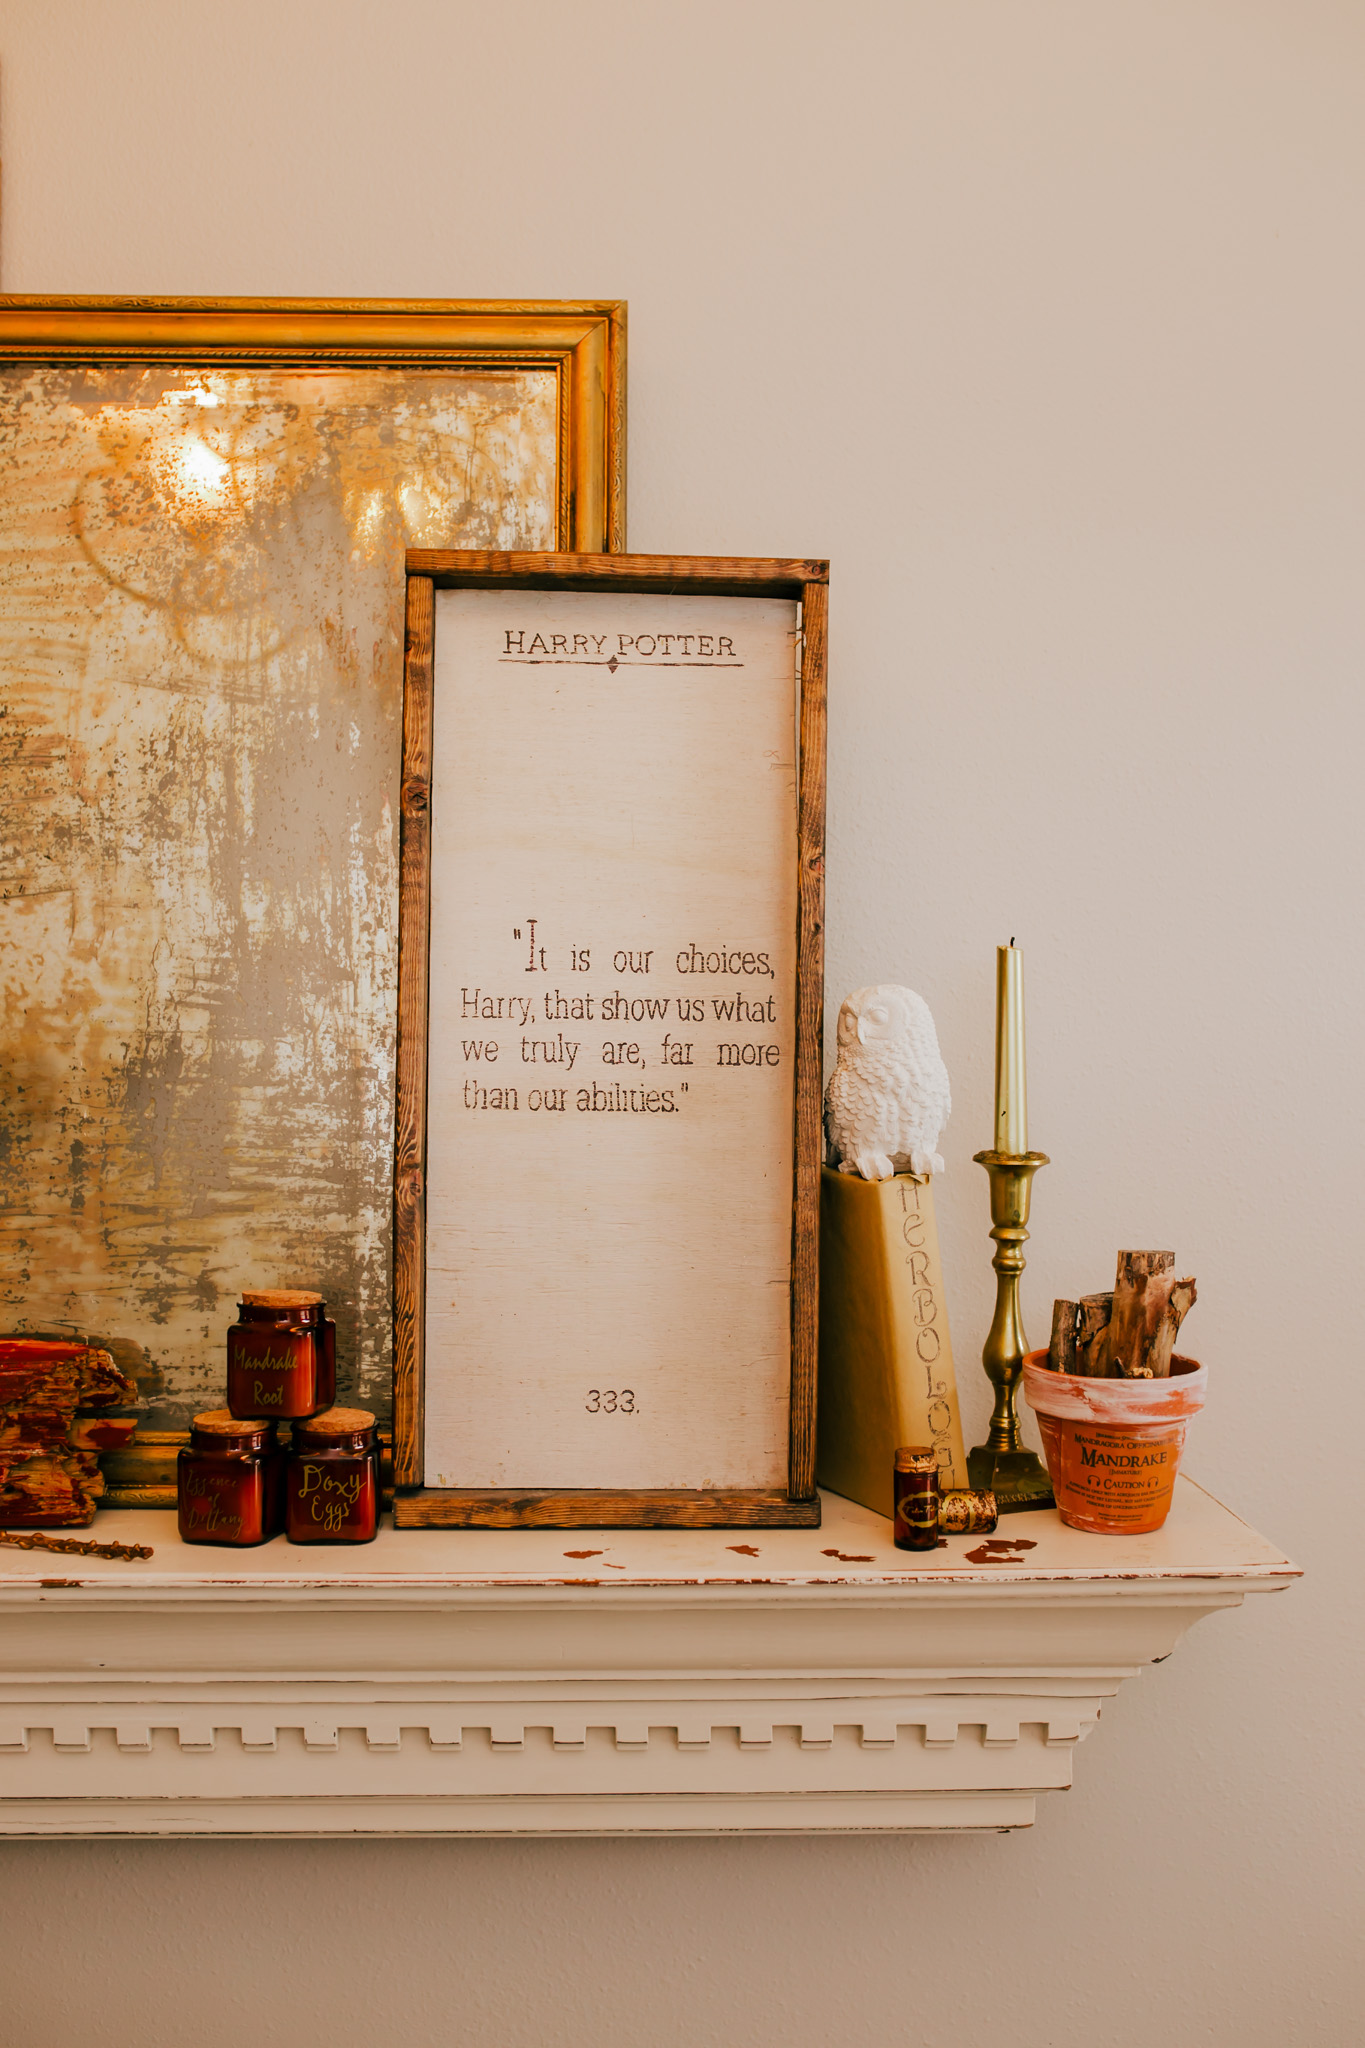
Then I added in my more themed pieces with a DIY framed quote from the books (again, scrap wood and cheap trim pieces are what I keep on hand for everything. You wouldn't believe how much money you can save by creating signs yourself!). 

Vintage brass candlesticks are the perfect pieces to start collecting if you are looking for a similar set-up. Check flea markets, Goodwill and other secondhand stores to get your collection going. They are the perfect magical filler and I can't get enough of them! 


Another trick for signs is to use old cabinet doors. Find them roadside, at flea markets or Habitat Restores and keep them on hand for a quick, already made blank canvas for signs. I used one for this Gringotts sign and created a stencil with my Silhouette to paint it in gold. Then swiped a bit of gold all around the black edges for a more mystical look. 


The Diagon Alley is another new one I added this year. I wanted it to resemble one of those directional street signs you might find on a cobblestone path leading into it. I took the worst part of one of my pieces of wood and literally cracked it in half to create the jagged edges. 

A little red paint, gold stenciling and a lot of distressing later, it looks like one you might find on a 1000 year old road, right?? 


Again, flea market finds are your best bet at getting the authentic feel! Any time I'm out just browsing, I always try to keep an eye out for something that screams 'magical'. All of these items above were bought for less than $5 a piece at various antique stores & flea markets. 

Those tiny amber medicine bottles were perfect for a little Liquid Luck. I added a little gold Rub n Buff to the lids and gold vinyl as labels. 

The brown pedestal bowl and blue glass orb were perfect to look like things Dumbledore would have tucked on his shelves somewhere. Or maybe in Trelawney's classroom. 

I found that gorgeous perfume bottle gilded with gold all over it already and thought it looked very "Love Potion'-eque. Just added a little water with red food coloring for the finishing touch. 


A simple terra cot pot is the perfect Mandrake prop with a little white paint, a label and a random root sticking out of it. Definitely needed a little Herbology in the mix :) 


Always keeping an eye out for magical items meant that these amber candles from the Target Dollar Spot were the perfect find to create ingredient jars out of. I simple turned them so the candle labels were at the back and added gold vinyl for lettering to them. They even had these cute cork toppers already on them! 


This chair was a new addition this year as well. While cleaning out the attic, I found it tucked in the corner from an old DIY I had done. Rather than throw it out (which almost happened!), I decided to embrace the rustic-ness of it and painted it black. The wooden seat was perfect for a little stain and gold lettering. 


I feel like touches like these make it have the most authentic feel. Who wouldn't want a chair from the Gryffindor Common Room?? 


I tucked an old crate with Hogwarts Lettering on it under the chair and filled it with all my DIY papers- Marauder's Map, Privet Drive letter, Hogsmeade permission slip, Gringotts bank slips and DIY textbooks peeking out from behind. 

A cauldron from World Market sits next to the chair filled with a broom (Nimbus 2000 to be exact!) and a Gryffindor Scarf spilling out. Again, tucking in bought 'new' items in with the old is the perfect way to keep it from becoming too character-y. 


The other side of the foyer still needs a few magic touches but I have to leave a few projects for each year, right? For now, my DIY 'Three Broomsticks' sign hangs from the opposite wall. Promising Butterbeer and magical memories for sure :) 

Anyone else creating magical spaces in their homes for the fall season? 

I'd love to see any of your projects or rooms inspired by my set-up, it would make my day! Feel free to email or comment below so we can all be inspired. I hope this fun set-up inspires you to usher in some magic of your own!!! 


October 12, 2016

Harry Potter Mantle & Room Decor

Hello sweet friends!!

I've been DYING to share this mantle set-up with you for forever but have just not gotten to the point where I could get pics of the whole dealio. 

Aren't you excited?? 
I mean it's HARRY POTTER. 

Do you remember our epic Harry Potter Party from last spring? 
If you haven't had a chance to check it out, I would LOVE for you to.
It definitely goes down into our party history as the most fun & most extensive DIY party we've done yet. 

Maybe because momma got to geek out a little on the decor. 
Maybe. 

But I knew that we'd be using a good bit of it in Little Man's room to jazz up his space since he's a huge HP fan. So party decor doubled as room decor. Score.

Plus we were planning a trip to Disney world that we took in June so we were also stocking up on HP costumes & what-not for that adventure :) 

So. 

When we moved the Harry Potter decor into little man's room we had the coolest area ever to work with. 
Because.
About a year ago, hubby carried this AWESOME and super heavy discarded mantle nearly a half mile to bring it home for me. 

That's love, gals. 

And we turned it into a headboard. 
Really, I"ll be doing a completely separate post on that later but you're going to see full pics of it today so I thought an introduction was in order. 
I'll be sharing the how-to and the before/after soon, I promise. 

But it turned out to be one of the coolest things in his room!
Not to mention, it was the perfect staging area for all of our Harry Potter goodies. 
Think Floo Power, friends. 

Let's check out all the Harry Potter goodness, shall we?


I mean, the perfect staging area, right???


All the signs, banners, books & bottles were DIY projects, guys. 
Let's definitely call this entire set-up a labor of love. 

I love the little 'expelliarmus' banner draped on the side. I asked Little Man if a banner was okay (he's almost 10 so you never know) and he said 'um, yea mom, it's a spell." 
Oh well, duh. 


I messed around with a lot of different looks before I settled on this one. 
I couldn't decide if I liked the asymmetry to it, I typically go for one larger centerpiece & build out.
But this one just seemed eccentric & eclectic enough to be Dumbledore approved. 


Oh, and don't worry, we'll be talking about that light set-up soon too. 
It was a not-so-simple simple DIY we are just in love with.
And one of those that you never thought would actually work! 


The trunk is another project I"ll share the step-by-step on soon.
I love how we were able to incorporate a trunk into the room decor. 
Trunks are the only way to transport all your wizarding things, guys. 

And the nice thing about emulating Harry Potter is that we don't have to keep things all perfectly neat. 
Perfect for a little boy. 


I really didn't have a rhyme or reason as to where everything went- I placed the larger signs first and just kind of layered around them. 
I used our spell books, blocks, wands & house banners to accent everything. 


And I"m thinking that even if you don't have a mantle headboard or a little one to utilize Harry Potter decor on, throw it all together for an amazing Halloween/Fall set-up. 
How perfect would that be? 

Or add just a few pieces into your fall set-up to give it a little Hogwarts flare. 

What do you think of our fun mantle?
Inspired to dig into your wizarding skills and DIY some fun items for your Halloween mantle?

Links are found below to several of my DIY items you see above!
Happy crafting :) 


----------------------------------------
Project Links: 
Spell blocks & Books found here 
Book spine lettering, tags, wand labels here
Links to free Harry Potter printables listed here
DIY magic wand tutorial here
Harry Potter Party here
------------------------------------------


Like me on Facebook. Follow me on Pinterest. Subscribe to my feed
Pin It


Linking to: 


post signature

May 17, 2016

DIY "Wax-Sealed" Harry Potter Invitations

Friends. 
The struggle is so real right now. 
Less than 2 weeks until school is out. 

Which means less than 3 weeks until work is done for the summer. 
The kids can feel it.
I can definitely feel it. 


And the end of the year has just been kicking my butt. 
So I'm hanging in there. 
But just barely. Anyone else in the same boat? 

I've been wanting to sit down and just pump out these last few Harry Potter posts so I can share some different projects I've been working on...and I just haven't had the energy.

So here's to hoping that getting this post out will inspire some sort of energy surge!

And, on top of the crazy work days & lack of motivation, my computer is running as slow as Christmas. 
Anyone else get incredibly frustrated when their machines are running like molasses? 

I digress. 

Let's talk Harry Potter invites.
Because I love coming up with fun invitations to set the tone for the party.

And with Harry Potter, there are so many ways to go about making fun ones. 

We finally decided to keep the invite itself simple and add some fun details to it to make it unique. 


And the best part about these invites is that it was something me and Little Man could do together. He actually told me that this was the 'best day ever' as we were working on them. 
Double points for getting him to do half the work AND enjoying it too :) 

Supply List
*Kraft paper sheets
-I purchased mine at Walmart. They were around $2 for 15 sheets of brown cardstock that were already cut at around a 5x7 size. Slightly smaller. But it meant NO cutting and no prep work for running these through the printer!
*Print Design (I created mine on Picmonkey.com)
*Twine
*Hot Glue Gun
*Red Sculpey Clay (one bar) 
*"H" Stamp


First things first, print your invite design out onto your pre-cut sheets of paper. 
If you didn't find pre-cut, go ahead and just cut the sheets to the size you're using & run them through your printer. 

If you'd like to use my invitation design, head over to this post to download the free printable for it. 
In my free printable invite, I left the details blank (times, dates, address, party type) so go ahead and add those details in yourself. 
Picmonkey.com is a free program that I use all the time. I downloaded the Harry Potter font and the Lumos font to use in my invite. Download these yourself and you can still use them in the Picmonkey program under 'add your own font'.

Once you have your printed invitations, go ahead and start working on creating your 'wax' stamps. 
If you haven't gathered by my crazy use of quotations marks, we are NOT actually using wax :) 
I didn't want to mess with the hot, messy stuff so I came up with this version. 
Easy enough for me and my 8 year old to do together. 


For the seals, gather your red Sculpey clay & your stamp. 
I used an "H" for Hogwarts. 
A regular rubber stamp would probably work better but I used the acrylic one I had on hand. 

Pinch off small pieces of the red clay, roll them into balls and then flatten them out. 
I didn't want mine to look perfectly round because they were supposed to be emulating poured wax- (Can I get a Hallelujah for crafts that don't have to be perfect?!?). 
Make rows of these on a cookie sheet. 


To get your imprint, simply push your stamp down into the clay, making sure it leaves an imprint underneath. 
I let Little Man do this part and he took it very seriously. 


After creating enough for your invites, pop them into the oven and bake according to the package instructions (they don't take long at all!). 

After they are baked, they'll be the perfect little addition to your invites!
Give yourself a pat on the back for creating your own crazy-awesome looking seals!! 

Then gather your supplies & actually put those puppies together.
This is where you'll need the twine, hot glue, the wax seals & your printed invites. 


Fold your printed invite into thirds, I made it so the two ends slightly overlapped each other, so it looked like a letter. 
Take your twine & tie it tightly around the invite, snipping the ends off. 
I pulled the tied part to the back of the invite so it wouldn't interfere with placing the seal. 
If they were real wax, they'd just cover the tied part & do its job. 
But hey, we can't all be as perfect as real wax. 

Take your faux wax seals and hot glue them to the front of your invite, where the overlap is. 
Then step back and look at that invite- it was practically made at Hogwarts!! 


We had so much fun putting these together- and Little Man loved handing them out to his friends at school and soccer. 
They may look expensive to do but most people will pay at least 5-10$, even if you're using pre-made cards & envelopes. 

All together, I spent about $10 for supplies (not counting the ink I used). 
Not too terrible considering how fun & unique they turned out!!


Didn't they turn out fun? 
And I know you're now dying to make some of your own wax-less wax seals, aren't you? 

Don't forget that you can get the free download for the invite here
And if you're wanting more fun ideas and pictures for your own Harry Potter party, I'd love for you to check out our version here

Here's to hoping that the next two weeks fly by (no pun intended) and that I'll get enough motivation to get the rest of these HP posts knocked out soon :) 

Happy Tuesday friends!


Like me on Facebook. Follow me on Pinterest. Subscribe to my feed
Pin It


post signature