Pages

November 30, 2011

Christmas Printable Number 3!

What is it about the end of a semester going by. so. slowly.
Agh.

One part of my head is looking forward 17 days from now to GRADUATION.
And the other part is still stuck in projects, papers and exams for the next two weeks.

And in case you're getting overly excited about me graduating and all (which I know you were!)
I've still got a year and a half to go to finish my program but I'm getting my bachelors degree in a couple weeks.
I don't officially become an OT until I have my masters though.
So... slowly but surely :)

Anywho.
I'm sure you wanted to know all that about my life :)

What you're really here for is the next free printable, right????

So no further dramatics...

These next couple ones are for the cutesy Christmas people.
My mom is obsessed with snowmen, so when one of my fabulous readers suggested this saying on my facebook page, I immediately went and fiddled with it.

Because come wintertime, there really is 'no man like a snowman'.
Unless you're man is like mine, and then you're all set.
(cue groans at my corniness)

So here's your little snowmen to have with you for the holidays....

Links to download are under each picture.

No Man Like a Snowman- Download Here


No Man Like a Snowman Hat- Download Here

As with all my free printables,
these are for personal use ONLY.
Please do not claim them as your own or alter them.
 
Find Christmas Printable 1 Here
Christmas Printable 2 is Here 
 
Hope you guys are having a great week :)
Don't forget to check back in tomorrow for the second half of 1 Ornament:10 Looks!!!!


post signature


November 29, 2011

Christmas Printable Number 2!

Printable number two is here :)

Even amongst all the holiday hustle and bustle, it's nice to have a reminder of what the season is all about!
So consider this a reminder!!

There are two versions, so pick your favorite, download and print!!
And as always, enjoy :)


*background graphic is from Sprik Space's Pattern Pieces series found here*


As with all my free printables,
these are for personal use ONLY.
Please do not claim them as your own or alter them.
 
Find Christmas Printable 1 here!
 
I hope you guys are having a great week and getting lots done!
See ya tomorrow :)


post signature

Linking to:

1 Ornament: 10 Looks (Part 1)

Are you ready for today guys???

I've been SO EXCITED (I know, I say that about everything, but really!!) to show you this little series. And considering I've been working on it on and off since the end of September, I deserve to be a little excited, right??

Anywho.
Today is the day.

For what??
For this...


Yup, guys.
I took one homely little .99 cent ornament from Hobby Lobby and did ten different things with it.
Who says you can't make cheap, pretty ornaments?

Well, I don't know if anyone really says that.
But it's not true :)

So here he is, ya'll.
The homely little paper mache ornament.

I actually lied when I said he was .99 cents.
Really he was like .49 cents.
Cuz if you hit up Hobby Lobby on their half off christmas weeks, then that's what ya get.

Boring, huh?


But don't worry, he's anything but boring now.

So on with the show.
Today I'm showing you five different ways to transform this one ornament.
Hobby Lobby had about three different shapes, but I made all of mine in this one shape.
I thought it'd be funner that way!

Plus, bonus! I made him over using all things that I had on hand.
I get major points on that, right?
At least that's what hubby says :)

Ready to check out his different threads?
Cuz I'm sooo ready to show you!!!


For Look number one, I painted him a pretty glossy blue from the Martha Stewart paints.
It gives it a pearly sheen and makes it look like you've layered glossy Mod Podge on it!
Love it :)

Then I took a box of upholstery tacks (I got them from Habitat Restore) and gently tapped them into the ornament with a small hammer.
I made a pretty swirl design as I went.

And then top it off with a yummy red ribbon :)


Look number two is super easy, I swear.
Remember how obsessed I was with Glitterblast spraypaint in the fall?

Well my obsession is still good for Christmas because it makes the prettiest, sparkliest ornament ever.
And NO shedding of glitter...Ack. That's my MOST favorite part.
This is with cherry glitterblast and takes oh, about 2.5 seconds to do.


Look 3 is my most favorite look out of all ten of 'em.
I painted it with black enamel paint that gives it a gorgeous sheen.
It's amazing that paper mache can shine that much, huh?

Then I used my cricut to cut out the brackets and 'jingle'.
A little mod podge helps it to stay on over the curves of the ornament.
Then I jazzed it up with some houndstooth ribbon that I tied white jingle bells to.
So pretty and festive.
I'm in love :)


Isn't look 4 so romantic looking?
Of course, you know I had to put some burlap on at least one of them!!
I just cut strips of linen and burlap into little circles and then layered them on with hot glue.
Another super quick way to dress it up.


And up last for today, a fun tribute to the whole feather trend this year had going.
I wrapped the ornament with twine first
(which is not the easiest thing to do, considering I may have burned off my fingerprints- lol)
Then I glued some pretty feathers around the top.

Nice and rustic :)


Eek. I'm so excited to have finally shown you some of them!!!

Which one is your favorite??

Isn't it amazing how many different ways you can transform something so simple?
And seriously, there's way more than ten ways to transform this ornament.
But ten is all you're getting from me :)

Seriously though, start digging through your stash and you'll be amazed at what you can come up with!

Don't forget to check back on Thursday to see the last five!!!

**And another FREE Christmas printable will be up this afternoon!!!**


November 28, 2011

Christmas Printable Number 1!!!

Can you believe that the first few days of December are just a handful of days away?

With all the early decorations and music in stores, you probably feel like it's been December for months now though :)

I hope you all had a great Thanksgiving break and are not dreading returning to real life as much as I am.
Although...I'm being greeted with a lab practical first thing on a monday morning soooo I'm pretty sure I'm allowed to be dreading it!!

I've been dying to share some fun Christmas printables with you and I've decided that the time has come to bring them out!!!

So here's what's going on this week in case you missed it on my facebook page :)


One of my favorite things to do is create fun, free printables to share with all my fabulous readers!
So I had a great time coming up with some Christmas ones :)

So much fun...that I ended up with five.
And, oh, I could have done so many more!!

But five will do for this year, don't ya think?
So be sure to check back every day this week to see if one strikes your fancy :)

Today I had to share with you one of my favorites.

If you liked my reindeer names sign I made last week, then you'll love this little series.
Because if you're short on time (which, serisously, who isn't??) then all you have to do to have the reindeer in your home is pick your favorite color, print and frame!!

Easy peasy.

Check 'em out.
Links to download each of them are found under the individual pictures.

Reindeer Names in Green (Download here)


Reindeer Names in Red (Download here)


Reindeer Names in Turquoise (Download here)

(graphics used are from Sprik Space's Pattern Pieces series. Love these patterns!)


As with all my free printables,
these are for personal use ONLY.
Please do not claim them as your own or alter them.


I hope you love them as much as I do!!

Don't forget to send pics if you use them- I'd love to share them on my facebook page :)

Happy Monday!

post signature

Linking to:


November 26, 2011

Ten Christmas Projects from 2010

Did you have a good thanksgiving??

I really hope you did and were able to enjoy some time with family and friends :)
Oh, and good food too!

It's been soooo nice to be off of school for this break and is going to be way too hard to go back come Monday.
Especially since first thing in the morning is a practical. Ick.

Anywho.
Since my blog has definitely grown in the past year,
I thought it'd be fun to give you guys a glimpse of some of my Christmas projects from last year.
Especially since you'll be seeing all of them in my decor this year too :)

As I sifted through them, I was amazed at how much I've changed.
Everywhere from knowing how to take pictures better, stage things, watermarking my photos... even down to just being able to decorate better.
It's fun to see how I've grown in just a year :)

So check out some of my favorite projects from last Christmas:


I love these countdown blocks- I made several of them for gifts and little man is super excited to count down with them again this year :)


This was my first attempt at subway art.
It was a little rocky and I definitely can do better now but I still love the charm of it :)


LOVE this garland and as long as you wrap it up carefully, you can use it over again!
I unwrapped it today and it works perfectly.
Adds just a little bit of christmas bling to the kitchen.


Super easy and fast project using a placemat.
Love this rustic cabinet door :)


Another super quick project with a good message!
And you know how I love to use up scrap wood.


This was quite a project but I love how it turned out.
Totally worth all the hard work that went into it.
I gave this as a gift and it was my favorite one I made last year :)


Looking at this, I can totally see huge changes in the way that I decorate.
I can't wait to show you my mantle from this year and let you compare for yourself.
I've got it figured out now :)
But I'm still in love with red, blue and silver for my christmas colors.
Some things don't change.


Love this project from last year and was happy to pull it out again this year!
Easy way to christmas-fy a simple pillow.


I announced on my facebook page that my wreath obsession has led to me having seven christmas wreaths.
I know, I know...
I just love them!
This one is still going on my front door this year- pictures just don't do it justice on how pretty it looks.
But I do have some fun new wreaths to show you soon :)


Another simple project using dollar store items.
My sister needed some fun things for her house so we whipped a couple things up!


I hope you enjoyed looking back a bit with me & I can't wait to share some new holiday projects with you!!

Next week will be all about ornaments and printables so I hope you're ready for some fun stuff going on (not to mention, free!!).

Have a great rest of the weekend guys and enjoy the end of your thanksgiving break :)

post signature


November 23, 2011

DIY Wooden Advent Calendar

Guys...I have been dying to share my advent calendar with you.
 It debuted at Me Making Do for her Crafty Creative Christmas series last week but I just couldn't wait any longer to share it here with you :)

I'm seriously in love with this project- it's my favorite Christmas project I've done so far!!

So without further ado...
----------------------------------------------

I wanted to show you a project that has been twirling around in my head since September and that I finally brought to life.
I've always adored advent calendars ever since I was a little kid and I love them even more now that I have my own little one to countdown with!
Little man loves watching the numbers countdown to Christmas and having something interactive is a fun memory to make each day during December.
I've been having fun playing with this old fence wood I got from a friend and decided it would be perfect to make a large advent calendar that would be fun for all of us.
(You can see how I used the same wood for some projects here and here)


Isn't it purty?
Love the natural grain it has!!

I also took some plain wooden discs that I got from Hobby Lobby and picked out all the larger circles.


At this point,
I just started playing with them, trying to find a design I liked.
I settled on a simple Christmas tree shape that worked perfectly with 25 circles.
And I love that December 25th would land at the tip-top of the tree :)


I decided to soften the wood a bit by white-washing it.
Just mix a little white paint with water until you have the consistency you want and then brush it on.

Keep brushing it on to get it as dark (or light) as you want.
I wanted to see the wood grain still so I did just a few coats.


While that dried, I got to work covering my little circles.
I wanted the numbers for the countdown on one side of them so
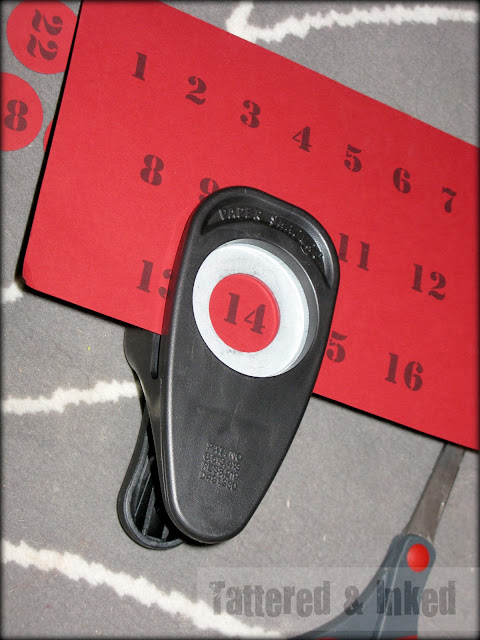
I printed out 1-25 on cardstock, alternating numbers with two different colors.
The picture below doesn't show them alternated but I did evens on red and odds on blue.

I used my new little circle punch to punch 'em out and it was the perfect size to fit the larger circles from the bag.
Score!
I just held the punch upside down so I could see where I was punching :)


Then I did the same with my patterned scrapbook paper for the other side.
This is where you can have lots of fun!

Grab whatever scraps or new paper you have and have fun mixing and matching them.
I used all kinds of scrap pieces I had on hand and loved all the colors together.
Just use Mod Podge to adhere them to the circles.


The scary part was drilling little holes at the tops of each one so they could hang.
I was worried they'd split but as long as you go slow and not too close to the outsides, they do fine.


See?
Little, perfect circles!


And just because I have to stay true to my name,
I had to ink them up a bit.

I just rubbed my black inkpad along the edges to give them the finishing touch :)
It makes them pop, huh?


I had to add some bling to the space underneath the tree so I added the words 'days til Christmas' in scrapbook paper, using Mod Podge.
I also took two of the smaller circles and covered them in cherry Glitterblast spraypaint for some holiday sparkle!


Are you dying to see it all put together??

Really? Are you?

Hm. Alrighty then.

Check it out...


What do you think??
I was so excited when I saw it all go together!!
The little circles are hanging on tiny white nails I had on hand.
I just laid the circles down to determine where they'd go, and hammered the nails in one by one.
You can totally tell my lack of OCD-ness by some of the stubborn, crooked ones :)

But check out the pretty burlap ribbon I wrapped around the top...


I love, love, love all the colors together.
Makes me so excited for Christmas to hurry up and get here...
...well at least for December, so we can start counting down!!

And as much as I love all the numbers showing, all ready to help us keep our days straight...


With the flip of the wrist the circle flips over...


...and you start making a gorgeous design on your tree!!

And you end up with something like this....


Isn't it fun?

Here's a quick supply list run-down in case you decide to make your own:
*Scrap wood for the main base
*White Paint for white-washing
*Wooden circles
*Assortment of paper to cover circles
*Mod Podge
*Small finishing nails
*Ribbon (optional)


Little man keeps asking how many days until d'member so we can pull 'the board' out.
So I'm glad we'll have something to keep him occupied while he's looking forward to Christmas :)


I hope you guys like my little DIY advent calendar because I sure had fun putting it all together!!

I'm so excited to finally share it with you guys!
It's been in the works for a while and was one of those projects I just kept thinking about until I finally had the time to do it :)

I hope you guys have a fantastic Thanksgiving tomorrow with all your loved ones.
And just in case you didn't know... I am SO thankful for all of you!!!

post signature

Linking to:
Visit thecsiproject.com


Visit thecsiproject.com