I'm finally getting myself together enough to start sharing more of the house :)
And today you get a two in one!!
In preparation for moving to the new, bigger house, Hubby agreed that we needed to start keeping some of the furniture pieces I was redoing.
We knew the new house would be bigger...therefore requiring more pieces to fill it up :)
I love when I get to keep some of the pieces I redo!!
One of the pieces I was most excited about bringing into the new house was actually one of the worst roadside finds I've ever picked up.
It was in pretty shabby condition.
From first glance, it may not look incredibly awful.
But as soon as you got your hands on it, you'd know.
Now, this is where my in-the-middle-of-moving mind came in and I *gasp* didn't get a total before picture.
I could kick myself for not because it was a doozy.
But apparently I completely forgot until I had already started working on it.
So this is the best I have:
Obviously this is after I had already gotten it cleaned and prepped so it doesn't come close to doing it justice as to how it was in the beginning.
At first glance (on the curb) it looked just like a dark cabinet that had been scuffed up and the drawer front was off. Not so bad.
After further inspection, the drawer was completely destroyed- the only thing to salvage from it was the hardware (And I did).
The main thing was that someone had obviously tried to fix it up at some point because there was sticky nasty stain residue ALL over the front of it. As in, someone had decided to touch up the stain and just slapped it on right over the existing finish. Blech.
Getting it in the back of our SUV was fun- we were trying hard to not let it touch anything and we just ended up with sticky stain all over us. The things my husband helps me with. Bless him.
So first things first were to get it cleaned up.
I rubbed some goo gone all over the front just to try and break up some of the sticky stain.
It helped quite a bit and then after a heavy sanding, I was able to get all the stickiness off.
As you can see in the picture above, I also heavily sanded the top of the piece to take any finish off of it. Someone had tried to replace the top and faired better in this area. So I had pretty good wood to work with.
After cleaning, sanding and removing hardware, I painted the inside of the piece a very pale grey.
After painting the inside, I concocted a mixture of several blues I had lying around so I can't tell you the exact color I ended up with. I was going for a pale aqua.
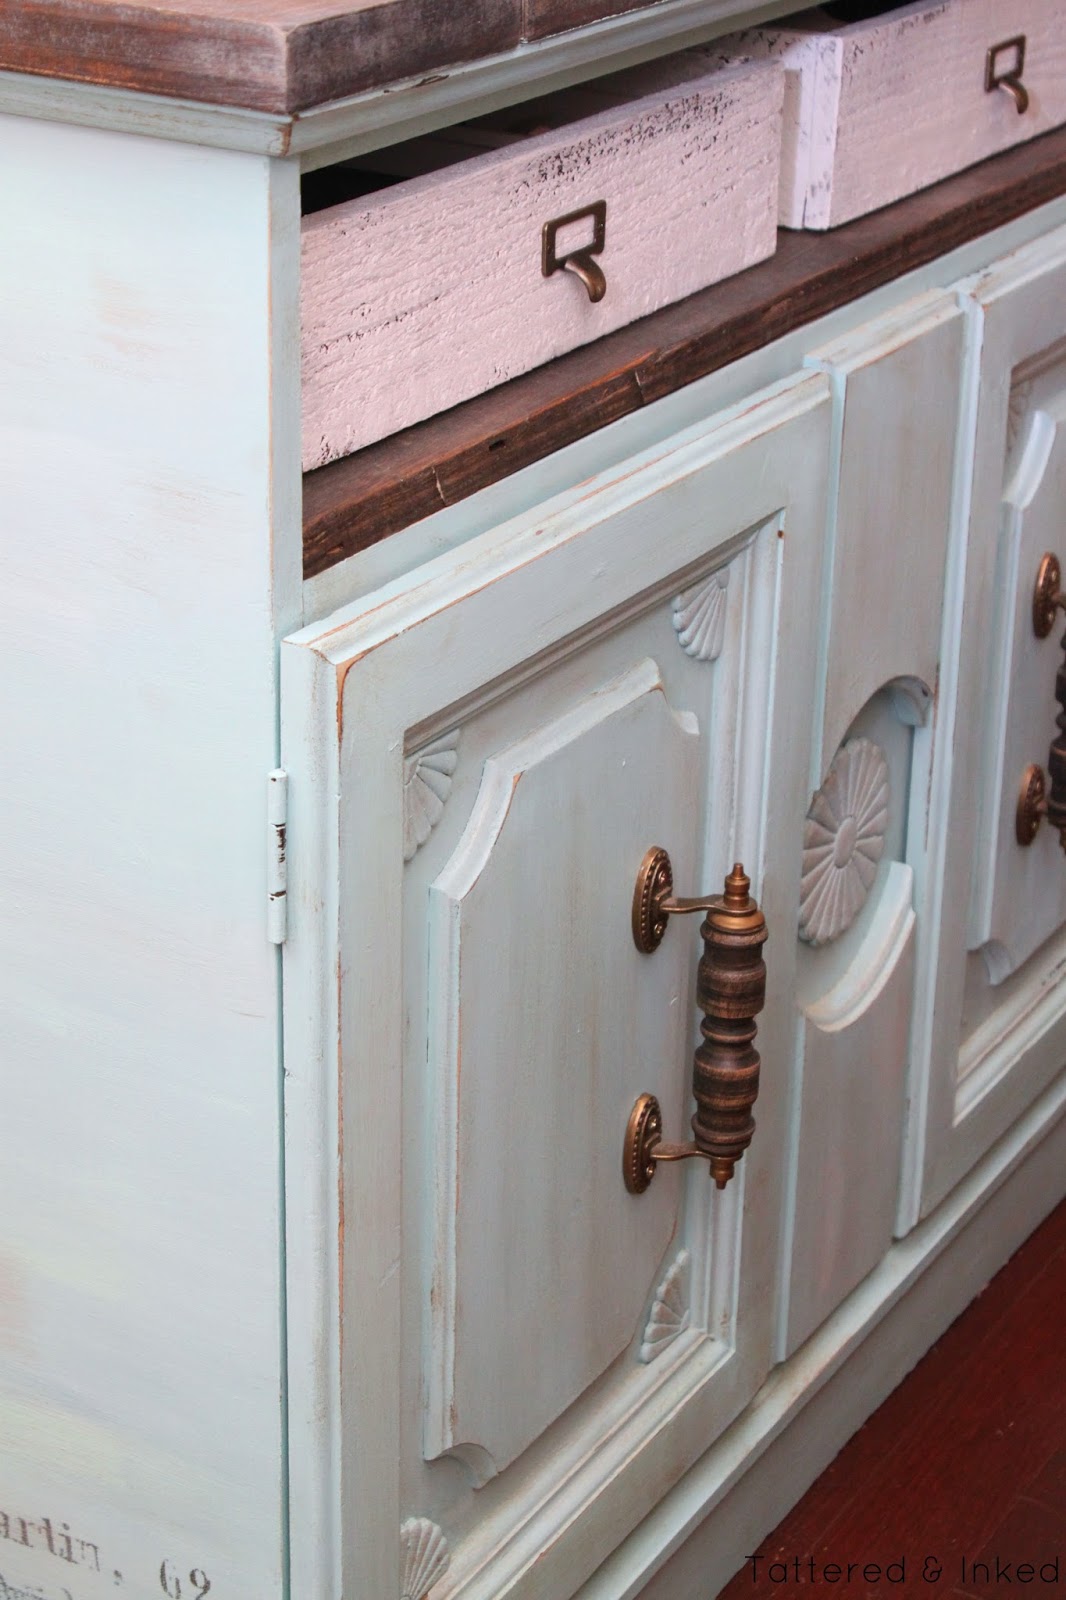
I gave the outside of the piece several coats of the blue.
I wanted an aged finish without distressing it like crazy so I dry-brushed several different colors on top of the blue. Mixes of darker blues, whites & dark stain did the trick but it was all completely by eye. I just added and wiped away until I was satisfied with the finish.
In the above picture you can see that the top panels actually flip out to create a bar top. I was so in love with it- I love when pieces have fun details like that! The inside was a black laminate finish so I ended up just painting over it with the same blue as the outside of the peice. It took several coats and letting it dry overnight to become dry enough to close again.
For the top, I wanted a weathered, dark finish so I put a thin coat of dark walnut on and then just touched up in certain areas to darken it without darkening the whole top. I wanted it to look worn in some areas so spot-staining it after the first coat worked perfectly.
After the stain dried, I took some white wax and rubbed it all over the surface. This ended up bringing out the grain gorgeously and gave it a worn, aged finish.
For the missing drawer, I replaced it with a piece of scrap, weathered wood I had lying around. It was banged up, had holes peppered throughout it and had rough edges which I was totally okay with :)
I cut it to size and stained it dark walnut just like the top. After attaching it to the piece, I decided it needed some cute crate-type drawers to sit on top of it. So I whipped up two very thin, square bins with some 1x4's. Both bins probably took 15 min to create- the longest part was waiting for paint to dry!!
I attached some cute card catalog hardware to the fronts and slid them in.
The gorgeous door hardware was from Hobby Lobby.
But wait!!
We aren't done yet!!
It needed just a little extra something so I decided to try and add some lettering to the top of it.
I wanted it to fade into the wood and not stand out too much so I didn't really want to paint it on.
So I attempted to transfer it and it worked like a charm!!
Since it was a cute little dry bar, I decided that a French wine label was the perfect choice for it!
And she'll even give it to you in the reverse format which you need for a transfer.
I used blockposters.com to split the label into different sections to make it bigger for the tabletop and then printed it out on transparency film.
Carefully handle it so you don't smudge it!
Then line up your pages onto your surface.
The above picture shows the film lying on the tabletop.
I used a wooden spoon to burnish it on.
Go over several times to make sure it transfers enough and be careful that your page doesn't move!
You can tell above where the actual film is (the darker letters) and see the faded letters underneath. This is how it'll show on your surface.
And there you have some gorgeous lettering!!
I love the faded look- if you wanted it darker, go over it with a paint pen or black paint and then sand it down to rough it up a bit.
I sprayed a light coat of clear coat over it to protect it from smudging and it hasn't budged yet!
I didn't want to brush the clear coat on in case it smeared.
After adding the top label, I added another pretty label to the side.
It showed up beautifully on the blue!!
Want to check it out all put together?!
I think the transformation is even better than I was hoping it would be!!
This piece sat and sat in our garage while it waited to move in to its new home.
I had a spot in mind that I noticed on our very first walk-through of the house that I thought would be perfect for this piece.
I kept my fingers crossed that it would fit and not take up too much room since it was right in a hallway.
But it was the perfect fit!!
This hallway is right off the kitchen (You can see the kitchen off to the left side and the laundry room is straight ahead). The craft room/office opening is directly in front of the table- it has a beautiful molded out entryway but is impossible to get a picture of it!!
I was a little worried that it might make the hallway feel narrow when walking through it but it doesn't in the least and the hallway would definitely feel bare without something in it.
Excuse me while we check out all sides of it :)
I forgot to mention that I added a small graphic to this side as well. Just to round it all out.
I love that it looks like it was stamped there for packing or shipping.
The door handles just make this piece so incredibly special in my opinion.
They are the perfect addition, bringing out the beauty of the top of the piece through that pretty wood color.
Isn't that top just gorgeous??
It definitely needed that fun lettering to make it unique.
The aged finish ended up so much better than I was wanting.
Now let's take a further look out at the wall behind it.
I have a great love for collage walls for two reasons.
1. You get to have a fun collection of all kinds of things you love. It uses so many fun pieces and they are unique and special in some way.
2. They are so easy to change up. Just mix up one or two pieces when you get something new or are in need of rearranging. Instant change!
The "What I love Most' piece smack in the middle was a piece from a mantle set-up a couple years ago. It's been sitting around waiting to be used again and it was the perfect centerpiece for the collage wall. I used weathered wood planks to back the printable in a painted white frame.
On the left side, I used a couple picture blocks in the corner.
Then a white oval frame from Hobby Lobby with white weathered planks behind it makes a great backdrop for clipping recent photos.
The yellow mirror was a project from a few years ago and is still one of my favorite quotes.
The blue and white striped chalkboard was an easy project from the old house.
On the right side are several more handmade pieces.
The yellow round mirror was a thrift store purchase that I painted and distressed.
The top frame was a super easy project I did last year to display some recent pictures of the kids. I used my embroidery machine to add our monogram to the burlap ribbon.
The Arkansas sign was a DIY project from last year.
My BIGGEST suggestion when doing a collage wall is to lay everything out on the floor or table first. Play with the layout, moving things around until they feel just right.
THEN hang.
I eyeball all my measurements- I'm not obsessed with things being super symmetrical but I hate blank spaces so I try to find pieces that fill the area up nicely.
Now, let's check out some before and afters of this pretty thing!!!
The top is seriously one of my favorite parts!!
It turned out so much better!!
Can you believe it was once a roadside reject??
I'm so glad I didn't overlook this sticky mess.
It was definitely the perfect piece to fit this area...which basically means it was fate :)
I'd love to hear your thoughts on my latest roadside rescue!!
Have you made over anything recently?
Added shelving, new hardware or made a collage wall?
I'd love to hear about it- either comment or post a link to my Facebook page!!
I'll be seeing you guys again soon. Have a great Wednesday!!